

PLUMBING
COMMON ISSUE #1 – RUNNING TOILETS
1) Open the toilet tank and check if the toilet chain and flapper are disconnected. If so, adjust the chain so that it is connected to the flush rod and toilet flapper.
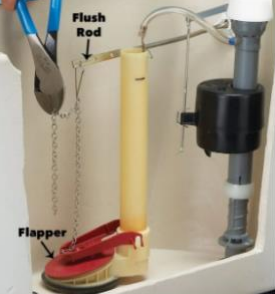
2) If the issue persists after adjusting the chain, contact our office.
COMMON ISSUE #2 – CLOGGED DRAINS
The most common causes of drain clogs are hair and soap build-up. We recommend the four troubleshooting methods for clogged drains. DO NOT use Drano or other commercial drain clog removers. Due to the corrosive nature of these solutions, it can melt away the adhesives that hold pipes together.
TROUBLESHOOT #1 - BOILING WATER
IMPORTANT NOTE: DO NOT use boiling water if you have a porcelain sink and plastic pipes. Boiling water can crack the porcelain.
1. Carefully remove the drain stopper
2. Pour the boiling water down the drain and repeat as many times as necessary until the blockage clears
TROUBLESHOOT #2 - VINEGAR AND BAKING SODA
1. Carefully remove the drain stopper
2. Pour 1/4 c of baking soda using a funnel
3. Using the same funnel, pour 1 1/4 c of of distilled white vinegar
4. Replace the sink stopper so that the solution doesn't bubble up
5. Wait for around 20 minutes
6. Run warm water down the drain. The blockage should be cleared.
TROUBLESHOOT #3 - DRAIN SNAKE
If the above methods do not work, the next step is to utilize a plastic drain snake or drain weasel, which are readily available at brick-and-mortar hardware stores such as Home Depot, Lowe's, ACE Hardware, Stoneway Hardware, etc., or through online retailers like Amazon.
1. Carefully remove the drain stopper
2. Insert the drain snake and move it around to catch any debris (usually soap buildup and hair).
3. Remove the drain snake by carefully pulling it out.
4. Run water down the drain. Repeat these steps as many times as necessary until the water runs down smoothly.
TROUBLESHOOT #4 - PLUNGER
If the above methods do not work, the next step is to utilize a plunger. You can use a hand plunger or a toilet plunger.
1. Carefully remove the drain stopper.
2. Add a little bit of water to cover the drain by about 1 inch
3. Center the plunger over the drain and apply force to create a small seal. Pump up and down for about 15 seconds.
4. Remove the plunger and test your drain.
COMMON ISSUE #3 – CLOGGED TOILETS
If your toilet is clogged, please utilize a toilet plunger. DO NOT use any of the methods in the previous section. If your toilet is still clogged after using a toilet plunger, call or text Text our 24/7 maintenance line at (206) 829-6089.
CLOGGED GARBAGE DISPOSAL
If you believe your garbage disposal is clogged, this may be due to large food scraps or objects getting into the drain. To resolve this, follow the below steps:
1) Making sure that the garbage disposal is turned off. If your garbage disposal has a plug-in cord unplug it from the outlet. For added safety, we recommend that you also turn off the power supply via the circuit breaker.
2) Reach into the garbage disposal and remove any scraps or objects you find.
3) Run water down the sink while turning the garbage disposal on to clear the drain.
JAMMED GARBAGE DISPOSAL
If you hear a humming sound from your garbage disposal but it won’t grind, your garbage disposal most likely has a jammed inner flywheel or impeller. To resolve this, follow the below steps:
1) Make sure that the garbage disposal is turned off. If your garbage disposal has a plug-in cord unplug it from the outlet. For added safety, we recommend that you also turn off the power supply via the circuit breaker.
2) Insert an Allen wrench into the flywheel hole, located at the bottom-center of the garbage disposal and turn it clockwise to dislodge any obstructions.
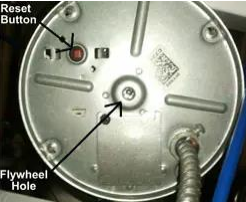
3) Once the debris or obstructions have been removed, restore power to the disposal by plugging the cord back in and turning on the circuit breaker switch that corresponds with the outlet. Push the reset button to reset the internal circuit breaker of your garbage disposal.
4) Run water into the disposal and quickly flip the switch on and off in short bursts, so that any remaining debris will wash down the drain.
ELECTRICAL
COMMON ISSUE #1 – OUTLETS NOT PROVIDING POWER
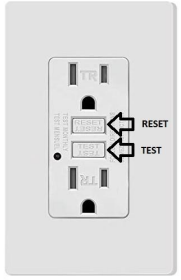
Some rental units may be equipped with a GFCI outlet, which can trip if too many appliances are plugged in at one time. This is a safety feature of a GFCI outlet to prevent electrical hazards such as shock or electrical fires. If you find that some of the outlets at your residence are not working, you may have a GFCI outlet, which you will need to reset using the steps below:
1. First, unplug all of your appliances.
2. You will see a TEST and RESET button on the outlet. Hit “RESET”.
3. Finally, plug in your appliance. This should reinstate power to the outlet.
COMMON ISSUE #2 – POWER OUTAGE IN CERTAIN ROOMS/PARTS OF THE ROOM
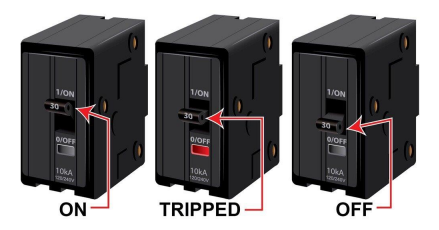
Some rental units may have a wall switch that controls some outlets in a room. If you have this at your residence, please make sure the switch is turned on and the power to the outlet should be restored. If this doesn’t work, check your breaker box to see if any switches are tripped. If so, flip the switch off and back on.
COMMON ISSUE #3 – CHANGING LIGHTBULBS
Below are commonly found light fixtures in our rental units. Please take care to ensure that the switch is turned off prior to changing lightbulbs. Utilize a ladder if necessary.
Dome-style light fixture
Video resource link | Video resource link for screwless
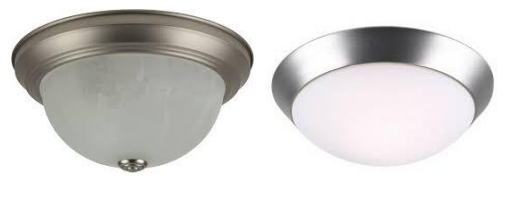
• To change the light bulb of a dome-stye light fixture, push the dome cover in and rotate it clockwise or counterclockwise to remove it.
• Remove the burned-out bulb by carefully unscrewing the bulb counterclockwise.
• Install the new bulb
• Carefully put the dome cover back and twist to secure
SPOTLIGHT-STYLE LIGHT FIXTURES
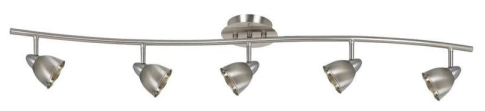
To change the lightbulbs on spotlight-style light fixtures gently pull the light bulb to remove it.
FLUORESCENT TUBE LIGHTS
BEFORE replacing fluorescent tube lights, make sure both the light switch and the power to the light switch are both turned off. This includes turning off the corresponding breaker switch from your breaker box. Doing this will ensure that no electrical currents will be running through the tube sockets during installation.
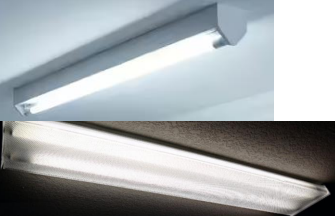
1) Gently rotate the tube 90 degrees (left or right, depending on your light fixture’s configuration), keeping your hands as close to both ends of the bulb as possible so that it is fully supported. Once the rotation stops and the prongs are vertically aligned, you should be able to slide the tube downward and out of the fixture.
2) Secure the new fluorescent tube in place by putting the small metal prongs in the tube socket. Rotate the tube 90 degrees (left or right, depending on your light fixture’s configuration) to fix it in place.
3) Flip the breaker switch on and your light switch on. Please note that it may take a full minute for the bulb to reach full brightness
OTHER COMMON MAINTENANCE ISSUES
SMOKE/CO DETECTORS
If your smoke detector or carbon monoxide detector is beeping, it most likely needs a battery change. We recommend changing your smoke/CO detector batteries at least twice per year.
NON-WIRED SMOKE/CO DETECTORS
1) Remove your smoke and carbon monoxide detector from its mount to access the battery compartment.
2) Remove the old batteries and replace them with new compatible batteries. Most smoke and carbon monoxide detectors have 9V batteries but yours may be different depending on the brand.
3) Test your smoke detector by pressing and holding the button. It will cycle through its alarm and stop.
WIRED SMOKE/CO DETECTORS
Wired smoke detectors run on the unit’s electricity. The batteries provide backup power in case of a power outage. They will still require regular battery changes like their non-wired counterparts. DO NOT detach the smoke/CO detector from the ceiling, because this will cause it to keep beeping even after battery replacement due to the device trying to seek a new main power source.
1) Before working on a hard-wired smoke or carbon monoxide detector, please ensure to turn off the power via the circuit breaker box to prevent electrical shock.
2) To replace the batteries, slide the battery cover to access the compartment and replace them with new compatible batteries, which can be different depending on the brand of smoke or carbon monoxide detector.
3) Test your smoke detector by pressing and holding the center button. It will cycle through its alarm and stop.
WATER FILTER REPLACEMENT
If your refrigerator is equipped with a water filter and it is time for a replacement, look for your refrigerator’s model number sticker. This is typically found inside the door of the refrigerator or freezer. Once you have the model number, you can search through online retailers to find the correct filter. We recommend following instructions provided on the retailer’s page.
REFRIGERATOR IS FREEZING ITEMS
Your refrigerator may be freezing your items due to the following reasons:
• Temperature settings: check your thermostat to ensure that your refrigerator’s temperature is not set too low.
• Blocked air vents: Sometimes, too many items in your fridge can result in blocked air vents. For refrigerators, it can cause food to freeze and for freezers, to leak into the fridge. We recommend rearranging your food so that the air vents can allow for proper air flow.
• Dusty air compressor. At the back of the refrigerator is the motor housing the compressor. Be sure to vacuum the dust, lint and hair accumulated on the vents to keep air flowing and prevent overheating of the compressor.
STANDING WATER IN DISHWASHER
• If you have standing water in your dishwasher, this may be due to food pieces being stuck at the bottom of the drain.
• Reach into the bottom of the dishwasher and pull up the drain filter.
• Remove all food pieces and rinse the drain filter
• Reference the user manual provided in your unit or look up the manufacturer’s user manual online to find instructions about which buttons to press to reset the dishwasher, which can often clear the machine of standing water.
• To prevent the dishwasher from clogging, scrape all food from dishes before putting them in the machine.
• Clean the drain filter at least once per month.
OFF-TRACK CLOSET DOOR
• If the closet doors fall off the track, check the floor guides to see if the screws are holding down the guides securely.
• If the doors hang from a top rail and do not have a track on the floor, then you need to tighten down the floor guides.
• If the closet doors are guided strictly by a top rail, please submit a work order via your tenant portal.
MOLD AND MILDEW
• Wipe down surfaces in bathrooms or windowsill with vinegar, water dawn dish soap solution and microfiber towel (or use a Swifter or similar sweeper to reach high places),
• Use an old toothbrush or cotton swab in tight spaces, such as tile grout and caulking
• Weekly cleaning of surfaces can help prevent or reduce mold and mildew.
• Remember to run kitchen and bathroom vents and open windows to let air flow throughout the unit.
Link to our Tenant Resources Page.
UPDATED 7.10.2026 1:02 PDT.